Posts

Showing posts from November, 2019

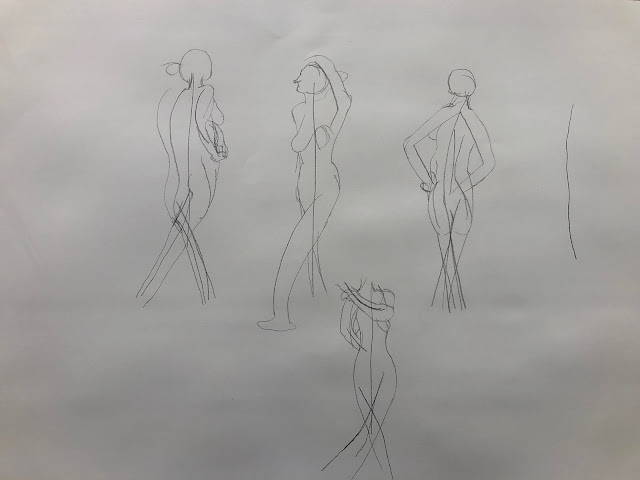
The Elephant bin object work in progress for the 3D scene in Maya

Image
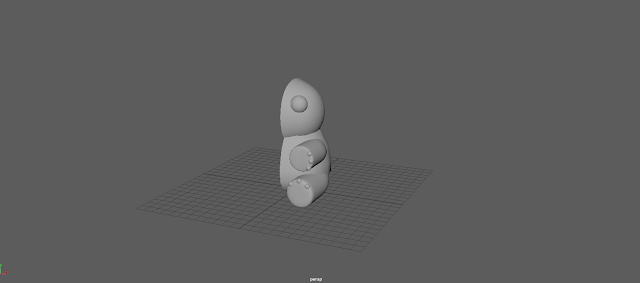
Out of all the objects I have to make for this project, the Elephant bin is probably the most tricky due to its more organic shape when compared to the other models I have made up to this point. Here all the parts have been made except for the ears. The body and head where made from a cube that is smoothed and re shapes sightly with a lattice. The arm and leg are made from cylinders that have been smoothed. The eyes and nails are made from just a basic sphere.

Toolkit 1: Animation: lesson 8-The run cycle

Image
I found the run cycle a lot easier then the walk cycle for some reason, maybe because there are less frames. Each step for the run cycle is only 6 frames long which means the entire cycle is 12 frames which is because it creates the illusion that the image is moving faster then if there where more frames. Regardless much like the walk cycle the arm that moves forward is opposite to the leg that moves forward. I also made it look like the ground is changing.

Assembling the chicken coop scene in Maya

Image
After making all the off the assets for the scene separately we imported them in to one scene using a top down map orthographic. Most of the objects had to be scaled to the right size. The lighting for the scene was applied in to forms, a directional light source to represent the sun and a sky dome for the general lighting. Both of which produced the shadows in the scene. Basic colors have been blocked in but the coop, floor and barn still require texturing.

Orthographic images for the background tower

Image
Another set of orthographic for a building that is too far away from the camera to be a hero object. In the same vain it will  not have as much detail put into it or redesigned as I do not have time. This one required an over head view to show the fact that the rings re not attached to the building and for placement. I don't foresee any problems modeling the building as its mostly basic shapes that can be made fro a cylinder or square without to much modification.

Hero object building work in progress for the what if metropolis project

Image
This is the mane hero object that will be in the 3D scene that I am still working on. I have made halve of so I can do the UV's for halve the objects and the mirror them over after wards to save time. By this point all the objects geometry have been decided up ad I am halve way through the UV's. I encountered some problems such not being sure how to make the windows. I initially tried to cut them out of the base of the building but that distorted the geometry so instead I made separate pieces out of cubes for the windows that I then divided up and extracted. When I was making the barn scene in preparation for this the orthographic where actual screen shots of a finished version that made then completely accurate, however working from separately drawn ones I have found is not as accurate as one is slightly of from the other meaning I occasionally need to turn them of and match the parts up to the actual model. Encountered a strange problem where for some reason I cant put edge

Travelogue of Fedora for the what if metropolis project

Travelogue by Charlie on Scribd

Toolkit 1: Animation: lesson 7-The walk cycle but silly (Updated)

Image
Todays lesson was also on walk cycles much like the last one but with a difference. We had to film are selfs doing a strange and silly walk first. Which then had to be animate in animate. I still have trouble with walk cycles so I dot know how similar these will be.

Life drawing session 8

Image
This weeks life drawing wasn't really life drawing as we know it. Instead we where discussing the willing suspension of disbelief and the rule of cool as well as there importance. This ended with us picking stuff we find cool and drawing pictures based of them

Charlie Whiffing OGR for what if metropolis project (25/11/2019)

OGR_What if Metropolis by Charlie on Scribd Life drawing: https://charliewucablog.blogspot.com/search/label/Life%20drawing Film review: https://charliewucablog.blogspot.com/search/label/Film%20review Photoshop lessons: https://charliewucablog.blogspot.com/search/label/photoshop%20tutorial Animate lessons:  https://charliewucablog.blogspot.com/search/label/Toolkit%20workshop

Production art

Image

Making a floor plane and fence in maya

Image
The chicken coop scene requires a floor with a beach and some small hills which is what this is. Creating this piece is probably the easiest model I have made in Maya, I started with one floor plane roughly the same size for the grass that was raised slightly and the edge beveled down. Followed by a second just below it for the sand. The hills where made by soft selecting different vectors and raising them. The fence was only difficult until I worked out that it was leaning as you can see the side of the planks in the top down view. Otherwise this was just simply about turning more cubes into the right shapes and adding edge loops in. Didn't need to do the UV's for this one either.

Finished chicken coop in Maya

Image
The chicken coop we started a few weeks ago is mostly finished, besides the colors of course. The parts that are actually in color where provided. For the most part this was just about mirroring what the halve we already had as well as adding in the center plank for the floor. The UVs have also been made for the pieces which where separated based on which of the two colors they where going to be.

Breakdown of 16:9 for the 3D set

Break Down for 3D Set by Charlie on Scribd

Connecting building orthographic images

Image
This is the part that connects two of the square building together and has been designed to match the changes that I made to that building. The images where made in photoshop using the shape tool and are in three images so I can more accurately model the object. This one much like the other building will be very easy to model, I don't foresee any problem.

Elephant bins orthographic images

Image
The elephant bins have been improved from the original versions in the concept and where based off my thumbnails and the plastic dolphin bins in Brighton. These where made in photoshop using the shape tool. There are only two as only the front and back will be visible in the scene. This whole model will be the hardest one to make out of all them, purely because all the parts are more natural shapes.

Cleaning robot orthographic images

Image
I redesigned the cleaning robot in the original concept with this more practical version which was based off my thumbnails, robot wars and the henry hoover. The are the orthographic images I made for the robot in photoshop using the shape tool. Only the front and side would be seen or require any real detail so there are only two orthographic images. Modeling the treads will be difficult for this model but otherwise pretty straight forward.

Lamp posts orthographic images

Image
The original lamp posts I had have been redesigned based off some of my thumbnails and victorian style street lamps. These are the orthographic images I made for the lamp posts in photoshop by using the shape tool. Only two perspectives where needed for the object as thats more or less the whole model. The only parts that I think will be hard to model are the ears and the two curved parts holding up the top.

Film Review 7: Black Narcissus

Black Narcissus by Charlie on Scribd

Laying out the UV's for the barn in Maya

Image
Doing the UV's for the barn was not difficult, the process is fairly straight forward. It just takes a long time and a lot of it is repetitive. The general process is that the objects that the UV's need to be done for are unfolded like a net for a cube, straighten them out and rotate them so they are the right way up. They also need to be modified so they are the same size and fit into one of the cubes on the grid. As this is a background object that will be further away from the camera, this is where it ends for this part as not as much detail needs to go into them. 

Improved concept art from the invisible city's project

Image
I made some changes to the original concept that where discussed during the last projects presentation. No major changes where made to the designs of the buildings and objects as that is what the production art is for. Its mainly texture and color changes the most obvious of which is that I changed the color of the globe on the museum to orange. Orange is the complimentary color to blue on the color wheel and helps make the blue tone of the rest of the scene stand out. I added some light blue behind the buildings at the very back to represent the light behind them coming through. Finally I attempted to make the textures for the buildings look like concrete but they dont look very obvious on here which means the picture is either to small or the textures need more work.

Influence map for what if metropolis project

Image
Using pictures from my last set of influence maps as well as some new ones, I assembled the last influence map for Fedora. An influence map that represents everything about the city. I made this one more of a collage than how I did the last one with even spaces mainly because there are more pictures here. To evenly space them meant making them potentially to small. Every picture represent something about my version of Fedora such as the lightning spike used to generate electricity, Habitat 67 and Trellik tower for the brutalist architecture style for most of the the buildings in the city, the Elephants that the bins and lamp posts are based of as well as more in this influence map.

Life drawing session 7

Image
The weekly live drawing continues and there is again more improvement this week than last week. By this point I have stoped making lots of little lines to make a picture and just use bold curves instead which means I am drawing these faster which allows more time for detail. The first four in the first picture are the warm up drawings that I construct by using curves and straight lines to figure out the pose first, then draw in the rest. The next three pictures had to be shaded in which still takes me quite a while to do as they aren't finished. Finally, for the last picture we had to use coloring pencils to draw them as well as draw arrows showing which direction we drew each line. For the most part my proportions have improved a lot but the head could still use some work in terms of size and shape when compared to the rest of the body. I can draw big but that is only with the assistance of the boxes I draw first which isn't a problem for know but eventually I am g

concepts square building orthographic images

Image
Using the improved concept design from the last Photoshop lesson I converted them into Orthographic images so the building can be modeled in Maya. The images are off the front and back as those are the only parts that will be visible in the 3D scene. I made these in Photoshop using lines and shapes to create the different parts.

Toolkit 1: Animation: lesson 6-The walk cycle

Image
Moving on from the last few lessons, we moved on to walk cycles which is probably the hardest animation for an animator to do which ironic considering how common they are. One step is 12 frames long which means two steps is 24, however these walk cycles are 13 frames long per a step because of spacing issues. The top GIF is where every pose for two steps has been made but they are positioned at an even distance that makes it look like the character is sliding on ice skates rather than walking. Beneath is the second GIF where those two steps have been layered on top of each other in two places to make the character walk more normal. I am confident I understand the different poses that make up a walk, walking is essentially where we fall and catch are selves with the other foot. The arm that swings forward is the opposite to the leg that is moving forward. As covered from Disney 12 principles of animation, every movement has a curve to it which can be seen here in the arms and how

Photoshop lesson 5

Image
Part of the project is taking out parts of the concept art and creating separate pieces of concept art for them that can then be turned into simpler orthographic drawings. This can also be used as an opportunity to change or improve the designs in the process. Which leads to this Photoshop lesson that was about just that. Here I took one of the buildings on the left of the concept art and improved it using references of brutalist architecture which are just below the concept art. The examples are of Habitat 67 and Trellik tower. Using the examples and some ideas I had, I started adding in more detail so it is more than just a box but somewhere that looks livable. Instead of having the cables just attached to the side of the building I added a generator where the power is stored that is also connected to the lightning spike that conducts the lightning from the clouds. Th Lightning spike is based of some thumbnails I did for it. I added some signs at the base for Aesthetic purposes. Th

Modeling a barn house in Maya

Image
As part of the test scene we are making in Maya as preparation for creating are actual 3D scene we made barn houses. The barn house will be in the distance of the scene so not as much detail needs to be put into its model. Only halve of the structure was really made while the other halve was mirrored across. The base of the structure started as one solid object before edge loops and the cutting tool was used to make the holes as well as making sure all the shapes are quads or triangles if they had to be. Every beam was made individually starting from a cube had to be beveled to smooth the edges and have edge loops put in to divide the objects for when the textures are put in. At this point I understand how 3D structures and objects are made. The base starts as one structure that is extruded onto separate and cut to make the holes. From their all the side parts such as the beams are molded from cubes separately.

Disneys 12 principles of animation

Image
The 12 Principles of Animation Squash and stretch Where a person or object is drawn to look like they stretch by getting longer in mid air and then squash by by getting flatter when they land. This is all done without changing the original size of the object. It creates an illusion that the drawings have some form of weight to them when they don’t  they are drawings. The squash and stretch is usually demonstrated with a ball which I will use the one I made in the lessons as an example. The ball stretches in mid air by becoming longer until it reaches the highest points of the jump where the shape returns to its normal round shape. When the ball lands it squashes in one frame to make it look like the ball has some form of weight when it does not. Anticipation The anticipation is the build up to an important action such as a character about to run or throwing a ball. Usually done by having a shorter action happen first such as stepping back before running